Organize Your Pantry

Step by Step Guide to Efficiently Organize Your Pantry for a Plant Based Lifestyle

Let's Organize Your Pantry!

In this section, we break down all the steps and the items that you need to organize your pantry for your new plant based life.  Every pantry is different – different sizes, different layouts, and different needs.  There is no single way to organize a perfect pantry so we focus on a step-by-step flow that you can follow to suit YOU and YOUR NEEDS just perfectly.

We explain the different steps to consider as you not only organize your pantry but prepare it for your plant based lifestyle moving forward.  MOST IMPORTANTLY, we lay out a system that you can maintain!  Yes, you can over-organize to the point where you just don’t have the time to maintain it, so things start to pile up, and then it takes a full project to get it back into control – and no one wants that!

We show you simple ways to organize your pantry from basic food categories, recommended backstock items, canister and bin choices, and sprinkle in easy tips to follow along the way.

BEFORE YOU START

A lot of these steps get pretty specific so set aside a few minutes to do a quick skim of the ideas first. Once you’re prepared to begin, review them more closely and create your plan. Purchase the necessary bins, choose a day when you have ample time, and dive into the heart of the project – just get started!

Pantry Step Icon 1

TAKE A LONG LOOK & DECIDE WHAT YOU WANT TO ACCOMPLISH TO ORGANIZE YOUR PANTRY

Take a few minutes just to look at your current panty and get a feel for what you have and where you want to go.  It might be easiest to start this project before going on a power-shopping excursion, but really any time will work!

ITEMS TO CONSIDER

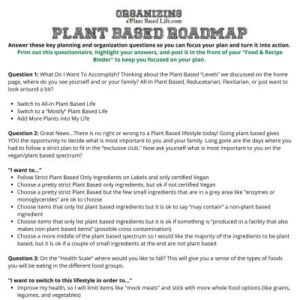
•Refer to the PLANT BASED ROADMAP PLANNING QUESTIONNAIRE to assess the potential changes you may want to make to achieve those goals as you organize your pantry.
•Refer to the list of common STAPLES & ESSENTIALS you need for a plant based lifestyle.
•Determine if you need to accommodate non-plant based eaters.
•Decide what you will do with current non-plant based items (use up, donate, or set aside for non-plant based eaters in the household).

Pantry Steps Icon 2

PURCHASE SEVERAL BINS IN MULTIPLE SIZES

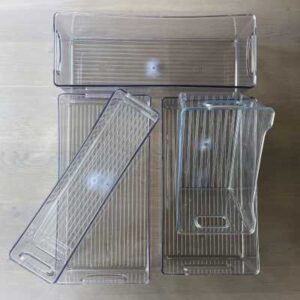
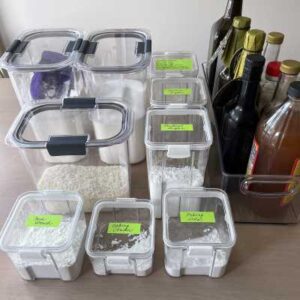
While looking at the pantry, make some quick notes on bin sizes you think you may want to use. Then take a quick look online to get a feel for some options available.  The CONTAINER STORE’S PANTRY page is a great resource to start.  Decide on the types of material you will want to use (BPA-free plastic, glass, or a combination of both) and approximately how many of each you will purchase.  Then go to a local store to purchase an assortment of canisters, containers, jars, etc. in a large assortment of different sizes so that you can play around with combinations to find the exact containers that you need.

Tips IconTip for shopping:  You can choose a big box store like Walmart to find a good selection of products.  One of our FAVORITE stores for this is “HomeGoods” where you can find a good assortment at very reasonable prices, but they may not have the number of items you need.  Other options include upscale stores like “The Container Store” as mentioned above where you can find perfect solutions, but items will likely be pricier.  You could also purchase online, but it can be a little more difficult to return unneeded items and it is also a little more difficult to get a feel for the actual size of the item.  As you are exploring your options, check out our curated KITCHEN STORAGE COLLECTION ON OUR WALMART STOREFRONT with a selection of containers for your pantry and fridge.

COMMON PANTRY ITEMS TO CONSIDER
•Containers
•Canisters
•Jars
•Bins
•Baskets
•Lazy Susan’s

Purchase more than you think you will need in multiple sizes so you can find the perfect fit while you are working in the middle of the project.  Then return what you don’t use – but you may find a use for them all!

Bins & Containers

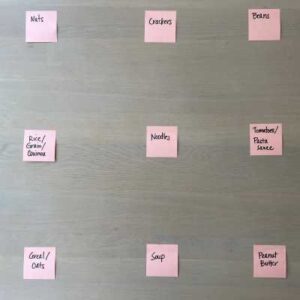
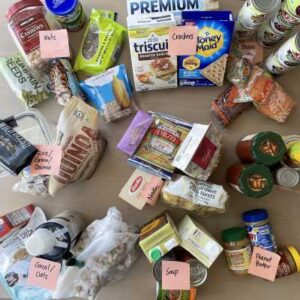
SORT FOODS INTO CATEGORIES WITH STICKY NOTES

Clear off your kitchen table and ALL the other surfaces in your kitchen.
This is very helpful so you can spread out all of the items into categories – the more clumped multiple categories are, the more difficult it will be to sort through them.
•Spreading out also allows your mind to totally focus on the categories AND to expand to more categories or areas if needed.

Prepare sticky notes for different food categories and spread them out on those cleared surfaces.  This step is really helpful for those starting with a more scattered pantry – if you have a more organized pantry to begin with, you could skip the sticky notes and go right to categorizing them by eye.

SOME CATEGORIES AND SUB-CATEGORIES TO CONSIDER
•Snacks:  Salty, Sweet
•Breakfast: Cereal, Syrup, Bars, Oats, Misc. Breakfast
•Breads
•Nut Butters
•Soups: Boxed, Canned, Veg Stock
•Crackers
•Nuts
•Grains+:  Rice(s), Quinoa, Lentils, Noodles
•Oils & Vinegars:  Olive Oils, Misc. Oils, Vinegars
•Baking:  Flour(s), Sugar(s), Baking Powder & Soda, Corn Starch, etc.
•Cooking:  Breadcrumbs, Panko, Salts
•Spices:  Heavily Used, Lesser Used, Backstock
•Pasta Sauces
•Canned Veggies
•Canned Beans
•Canned Jackfruit
•Canned Refried Beans
•Canned Tomatoes/Paste
•Coconut Milk:  Canned & Boxed
•Dressings
•Protein & Peanut Butter Powders
•Root Vegetables:  Onions, Potatoes & Sweet Potatoes (best if you can separate onions from potatoes for freshness)

Food Category Notes
Pantry Steps Icon 4

REMOVE EVERY ITEM FROM THE PANTRY

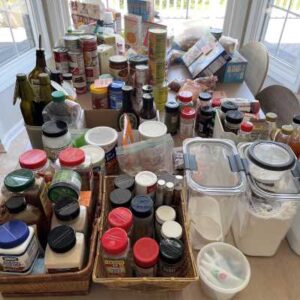
Remove every item from the pantry and place in the proper section for that category.  By placing them out and next to one another you see exactly what you have – and you will be surprised at what you find tucked away in the back corners.  You will also get a feel for the amount of space you will need for each category, and the size of bins you may need.

Look at each item:

Date:  If expired, toss and add the replacement items to your grocery list.

Foods Placed Into Category

If NON-plant based, decide:
•If you will USE IT UP, then create a new category “USE UP SOON.”
•If you will REPLACE IT WITH PLANT BASED then toss or better yet DONATE to a nearby food pantry, and write on your grocery list to find a plant based option to replace it (an example of this may be something like Mayo).
•If you will KEEP FOR USE BY A HOUSEHOLD NON-PLANT BASED EATER, decide if you will keep these items mixed with plant based, or keep the sections separate.

Tips IconWe started out keeping items mixed them together – with items like “regular” and plant based Mac & Cheese’s together in the Mac & Cheese category (I know pretty funny to have that category but true!), but later changed to separate sections as the number of non-plant based eaters in our family downsized.  This can be trial and error, do what works best for your family, and don’t be afraid to adjust along the way.

This is also the time to decide if you want to go “ORGANIC” or “MORE ORGANIC.”  If this is something you want to do, make a mental note that you will rotate in the organic products for particular items & write this on your grocery list (we did this with all of our canned items a few years ago).

Finally, if you have a particular item lingering in the pantry and aren’t sure you will use it – move it to either the “Use Up Soon” category or put it in the Food Pantry Donation pile, someone else will definitely put it to good use and it clears a spot for items you know you will use.

Pantry Steps Icon 5

CLEAN-CLEAN-CLEAN

Now that the pantry is completely empty, chances are it will need a very thorough cleaning. This is an important step not to be missed as you organize your panty.

•Wipe down all surfaces and walls with a wet cloth.
•Repeat once again with a “magic eraser” to remove all the scuff marks and any lingering food particles.
•Repeat one last time with another wet cloth to remove all the magic eraser dust.

•Repaint, if necessary.
•Fix shelves, if necessary.

Clean Pantry Surfaces

•Put down shelf liner, if desired.
Tips IconIf you do decide to add or replace the shelf liner, do a quick measure of the size you will need – we used a lot more than expected.  A great place to get a large amount of liner for a reasonable price is your local warehouse club like Costco or Sam’s Club.

Pantry Steps Icon 6

WHEW! YOU ARE GETTING THERE - IT'S TIME TO TAKE ANOTHER LOOK AT YOUR CATEGORIES

You have done a great job so far and you can be proud!  Right about now it can get a little overwhelming, with everything in piles all over the place.  Don’t worry, just dig in to make a few more decisions and you will be done before you know it!  Take another assessment of what you have laid out on the table and other surfaces and make a mental note of how you may put things back.

Tips IconTIPS ON PLACEMENT OF ITEMS:
•Heavier items (like canned beans and jars of pasta sauce): these are best on the bottom shelf or floor level because of their weight.
•Items used most often: these are best to go in the middle.
•Snacks:  do you want them “out of sight – out of mind” if so place them high and behind other items.  However, if you have some healthy snacks that you want to be easy to reach, then put that at the mid-level, and if you have special kid snacks for the little ones, place those closer to their level.

This is also a great time to look at your “Backstock Items” – those surplus items that you rotate in after your current items run out.  As a plant based eater, there are a lot of items that you can keep in bulk like canned beans, noodles and grains, seeds and nuts, and many more.  This makes shopping a lot easier, so you can buy in bulk and minimize your trips to the store.  In general, do what you feel is most intuitive for you!

•It’s always easiest if you can keep all of your panty items together, so If you are able to keep your backstock in the pantry, make a designated section for those items OR intersperse them with that category of food (some people like to keep the Baking backstock items like sugar near the baking section of the pantry, while others prefer to put all backstock items together regardless of category).
•If it has to be in another location (like a basement shelf, closet, or garage) that’s not a problem, just make sure that you bundle it together, so you know where to find it when you need it, and REMEMBER that it is there.

COMMON BACKSTOCK ITEMS
•Canned Beans
•Cereal
•Baking Extra’s
•Quinoa
•Tahini
•Mustards
•Sauces: BBQ, Soy, Stir Fry, etc.
•Nutritional Yeast
•Sun Dried Tomatoes
•Jelly & Syrup
•Pickles:  Relish, Pickles, Hamburger Pickles
•Seeds:  Flax, Hemp & Chia
•Nut Butters
•Ketchup & Mustard
•Lemon Juice

Look at Categories Again
Pantry Steps Icon 7

COMPARE YOUR DIFFERENT CATEGORIES TO YOUR DIFFERENT BINS

Pull out all the jars, canisters, and bins you purchased and start comparing the different sizes of each category to the different containers you have.

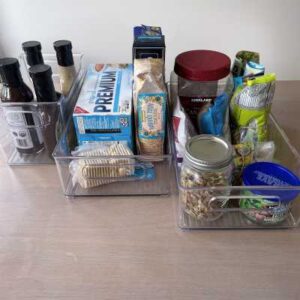
•If you find a perfect fit bin or canister, then fill it (and put it in the pantry if you know where it will go).
•Look at some categories like nuts that can use smaller jars to see if you can go that route.  Take a look at our USEFUL GADGETSpage to get more information on how to use these jars.
•If you are having trouble with this step, skip it and go to Step 8, where you start to put the items back into the panty to see how some of the puzzle pieces will work together first before placing them into bins (we did have a little trouble here, so we opted for this route – but either way you will get to the end where you want to be!).

Look at Categories & Bins

Tips IconTIP: Don’t remove any bin labels for a while!  We found we changed things around a couple of times and even went back to the store twice for more bins in better sizes as we worked our way through the project.

COMMON CLOSED CANISTER ITEMS:
•Cereal
•Rice
•Quinoa
•Sugar
•Flour
•Powdered Sugar
•Brown Sugar
•Breadcrumbs (each for Italian, Panko, Matzo, etc)
•Baking Soda
•Baking Powder
•Corn Starch

COMMON BIN/BASKET ITEMS:
•Nuts
•Crackers
•Misc. Breakfast
•Plant Based Soups
•Nut Butters
•Bread
•Grains: Noodles, Small Batch Rice, Lentils, Dried Beans
•Oils
•Vinegars
•Larger Spices
•Backstock
•Non-Plant Based Items

Pantry Steps Icon 8

START PUTTING ITEMS BACK IN

Next, start returning the items by choosing the categories YOU KNOW will go back to a certain area.

Like your cereal and breakfast goods or that stock of canned beans.  By putting back what you know, the piles go down and things start to look a little more manageable.

Refer back to the tips in Step 6 for a few basic recommendations for the placement of items.

Slowly add back everything and take a look at what you have.

Start Putting Items Back In

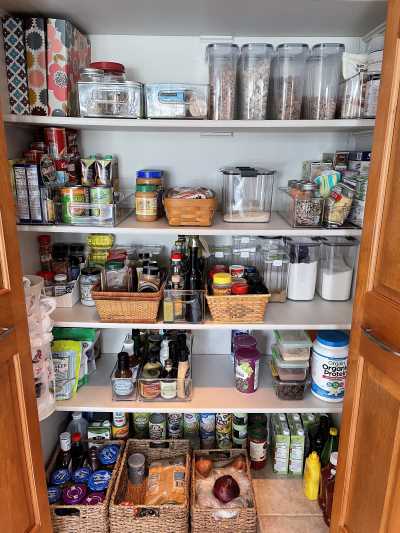
Tips IconI started returning my items without bins because I was having trouble finding the right bin sizes.  Initially, I was a little disappointed when I got everything in its place because I didn’t think it looked significantly different enough from what I originally had.  However, a couple of family members each commented how nice it looked, so I do know I made a difference.  Then when I completed Step 9 and found the right bins for each category, I really noticed the full transformation.

Pantry Steps Icon 9

FINALIZE YOUR BINS & CONTAINERS

Now that your items are back in the pantry, you can really see how the bins all fit together.  I started putting everything in one size bin and found that a different size was much more suitable to our particular pantry dimensions and layout.  This is just a trial and error process, but it really does make things come together.

TIPS FOR RETURNING ITEMS

•Remember to accommodate items that are low in stock now, the bin that looks perfect may be overflowing too much once you stock up within a category.

•Once you have a layout that works, then wash and fill your canisters.  You can also remove the labels from your bins, or wait a little longer just to be sure (I like to marinate a few days).

Finalize Bins & Containers
Pantry Steps Icon 10

ENJOY YOUR HUGE ACCOMPLISHMENT!

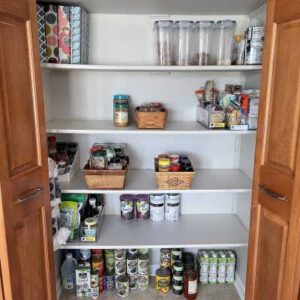
See – we knew you could do it!  You accomplished a big feat and you should be proud.  Not only did you organize your pantry, but cleaned it, found the perfect bins, and even made it more organized for your new Plant Based lifestyle.

SOME FINAL TIPS TO NOTE
•Keep that “Use it Up” pile outside the pantry or at a location inside the pantry that you can’t miss.  Get those items used up and out of the way.
•Make sure as you use up an item in your new pantry, you pull it from your backstock and write it down on your grocery list so you never run out.
•Create a plan for the replacement of items and add your newest stock items to the back of your old items as you restock.  This ensures you always have fresh items and limits those expired items.

Keep a close eye on it for a couple of weeks and tweak it as you see fit.  The more you look the more you find little ways to keep making it perfect for you!

Final Pantry Organization

Please note, this page may contain affiliate links to our curated WALMART STOREFRONT and we may receive a very small commission for each item sold to help with the upkeep of this website.  Please be assured you will never pay more to purchase any of these items.